Editor’s note from Dr. Wolf:
Implanters have been given new life when dulled and used to place FUE grafts into premade incisions. While the concept is alluring, there have been no studies that prove their superiority by comparing growth in side-by-side (forceps vs. implanter) clinical trials. A rosy picture is painted by their adherents. Dr. Antonio Ruston, in a recent Cyberspace Chat, wrote: “Implanters cause less trauma than forceps—this is a fact.”1 Until proven, I disagree. It depends on the situation and experience of the placer. In this same column, Dr. Speranzini noted that by using an implanter, he can place a 4-hair graft into a coronal incision as small as 0.75mm in width.2 While this may be possible, I have seen unsightly compression when grafts are forced into incisions made too small.
Ahmad et al. have concerns about using implanters, including trimming grafts closely so they can be placed into implanters whose diameters are as small as 0.60mm.3 Studies have shown chubbier grafts have a better survival rate. They are also concerned about the potential desiccation of “skinny” grafts and the risk of trauma to grafts during loading, placement, and twisting to adjust their angle of exit after placement.
In the same chat, Dr. Speranzini stated: “Placing the grafts is just a technical task.”2 I take exception to this statement having personally placed millions of FUT and FUE grafts using forceps and consider graft placing a rate-limiting step in the surgical process. Placing is as important as donor harvesting. Implanters may make placing faster and more delegatable, but whoever does it and whatever method or tool is used, placing is a craft that takes experience to be performed at the highest levels. I assess every follicle in every graft with 4.5× magnification and place the highest quality grafts in areas of highest cosmetic priority (differential graft placement). Some grafts are rejected, others are placed in areas of lesser importance. When using implanters, this inspection can’t be done. Grafts are blindly placed into implanters and then into the scalp. I’ve tried implanters, but for the above reasons, not extensively.
Dr. Speranzini’s above article is an excellent “how to” for those contemplating the use of implanters. I look forward to a healthy debate in the future. It is important to determine not the fastest or easiest path, but the one that produces the highest quality results for our patients.
INTRODUCTION
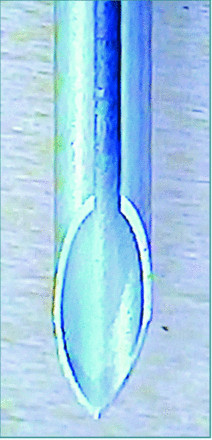
Graft implanters were described by Choi in 1992.1 The instrument was designed to be used with sharp needles (Figure 1), which allows simultaneous site making and placement of FUs, accelerating the implantation process.
Sharp needle
Since only the surgeon was allowed to do these incisions, and thus delegation of placement was not possible, this instrument was not incorporated by most teams worldwide.
With the popularization of the follicular unit extraction (FUE) technique, in which the FUs are even more delicate, the advantage of implanters has become more appreciated for its atraumatic placing of the grafts. In the FUE technique, typically the surgeon has the responsibility and the job of harvesting all the FUs. But in combination with a one-step sharp implanter, this can lead to work overload and consequent fatigue for the surgeon. The dull needle implanter (DNI) technique allows a gentle placing of the grafts and permits delegation of placing to the technicians.2 The site creation is done by the surgeon and dull graft placing is less traumatic.
It is common for a team to have great resistance to change from a routine that’s been in place for years or even decades, such as is the case of using forceps for placement of grafts. It is up to the team leader to show the benefits of change, especially if we are talking about FUs harvested using the FUE technique. In order to make the transition a success for the technicians, it is essential that the physician understands all the advantages of the technique and how to teach the use of implanters.
THE DULL NEEDLE IMPLANTER
Although the use of implanters in premade sites was mentioned and eventually used by some colleagues,3,4 its advantages have never been described in detail. In 2016, I published an article in the Forum describing nine advantages of the DNI (dull needle implanter) technique.2 To these, Dr. Vance Elliot, who commented on the article, added two others. Dr. Robert True, in his Co-editor’s Message lead-in to the article, noted the technique “could very well become the preferred method for placing FUE grafts.”
The basic difference between the traditional sharp needle implanter and the dull needle implanter is that it is impossible for the latter to pierce the skin. This allows delegating the placement after the creation of premade recipient sites. Because there are currently no implanters sold with premade dull needles, it is necessary to modify them in an artisanal way.
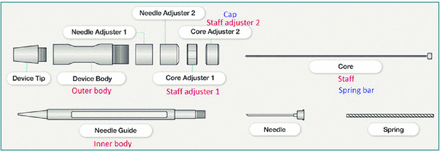
Diagram of an implanter
Figure 2 shows the parts of an OKT implanter and, in red and blue, the different names used by other companies.
OKT implanter
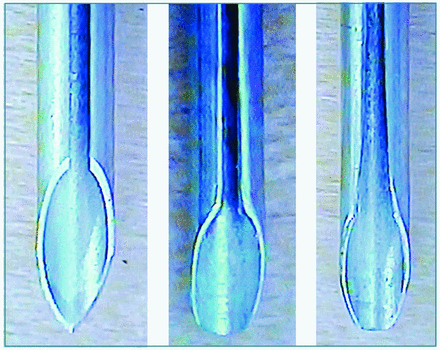
How to turn a sharp needle into a cannula
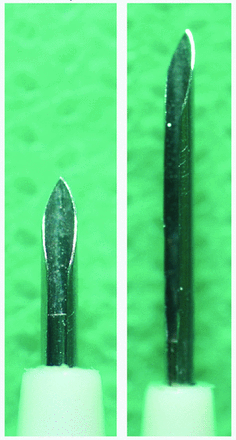
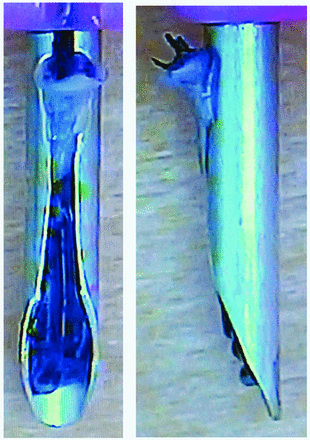
For this, we use 600- or 400-gram sandpaper, but smaller (coarser) weights can also be used. Another option is a sandstone. The process takes less than one minute (Video 1). The needle loses the ability to pierce and acts as a cannula. After proper washing and sterilization, it can be reused indefinitely (Figure 3, left and center).
left to right: Sharp needle; dull needle; dull and widenedneedle
Note: Simply mentioning the reuse of a needle causes astonishment and fear of the risk of transmission of infectious diseases. In reality, sanding the needle (piercing-cutting instrument) transforms it into a cannula (non-cutting steel tube). The use of a cannula is a traditional practice in plastic surgery, both in filling procedures and in endoscopic surgeries. Likewise, sterilization care should be equally rigorous (see “How to Clean the Implanter” below).
That said, if the physician still does not feel comfortable with reusing dull needles, the same benefits of the technique can be accomplished with disposable ones. To do this, simply sand them exclusively for a single procedure and throw them away at the end of the operation. Sanding can be done prior to the surgery, followed by sterilization. It can also be done during surgery, with new sterile needles if a piece of sterile sandpaper or sandstone is available.
HOW TO MODIFY THE DULL NEEDLE FOR EASY LOADING
Implanters were designed to be loaded by pulling the FU by the shaft through the needle channel. For this, the channel is wide enough just for the passage of the hair (Video 2).
Another way to load the implanter is by pulling the epidermis through the channel (Video 5). This allows the surgeon to verify that the implanter has been loaded correctly, with the concave portion facing forward. If it is not in the correct position, it is possible to rotate the implanter until it can be withdrawn with the FU in the ideal position. The out-of-channel epidermis also helps prevent the FU from being introduced too deeply, burying it below the skin level. To facilitate the passage of the epidermis through the channel, we described a modification that makes loading faster and less traumatic. Although the Lion implanter has a wider channel than other brands, it is advisable to widen it mechanically, too. Two different tools can be used:
A very fine tipped diamond drill widens only the top of the channel at the proximal edge of the bevel (Video 1).
The second, more efficient way broadens the channel more extensively. With 5× magnification loupe, we use a 2mm-thick diamond disc.
The sanding of the needle tip and the widening of the channel needs to be performed only once (Figure 3, right). This cannula can then be reused during hundreds of surgeries. After it is modified, it is not necessary to change it unless it gets damaged by accidental falling.
IMPLANTER CHOICE
1. Diameters
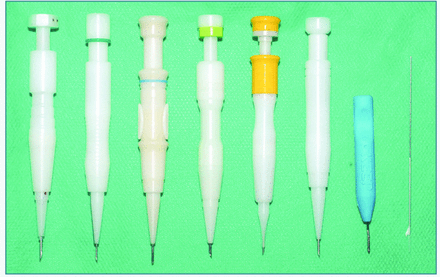
Implanters are sold with sharp needles (Figure 1). For each needle size, there is a specific deployer. Each manufacturer has criteria to differentiate one size from the other, usually with specific colors in some parts of the instrument or with inscriptions or drawings (Figure 4).
left to right: Hwang; KNU; Lion; OKT; Rainbow; Smart;Keep; Shiao
It is advisable to have several different diameters available, because the size of the FUs varies from case to case. In follicular unit strip dissection (FUT), there is usually greater variation in size than in FUE, where the grafts sizes are more uniform.
The table below lists available sizes from different brands.
2. Implanter durability
In the traditional use of sharpened needle implanters, the ability to repeatedly pierce the skin is critical, however, in the DNI technique, this is irrelevant; any brand of implanter can be used.
3. Lightness, ease of handling, assembly, and cleaning
The ideal implanter is one that is light, will not slip between the fingers, and has parts that glide smoothly. It should not be too thin or too thick. Ideally, it should allow a grip similar to that of a good pen. The ideal implanter should have as few parts as possible. Quick assembly and disassembly make it easier to prepare for the next surgery.
For cleaning, consider the following:
There are devices for sterilization with ethylene oxide for use in offices. When they are not available, it is necessary to send them to specialized companies, making it difficult to use them daily because of the delay and the need to have a greater number of implanters.
Immersion in bactericidal solutions for sterilization is of questionable efficiency and is prohibited in some countries.
Autoclaving is efficient, quick, and easy to access in any office. Its major drawback is that it can affect the life of the implanter. It is essential to follow the autoclave manual and choose the correct cycle for plastic materials (implanter body) and a longer one for metal parts (spring, staff, and needle).
The ideal implanter should remain intact even after hundreds of autoclaving cycles. The Lion implanter is made of tough, non-deforming plastic material, holding up after repeated autoclaving cycles. On the other hand, both the needle and the staff have both steel and plastic parts, which come apart and need to be glued from time to time (see below, “How to Fix Implanters”). In contrast the OKT (Chois Instruments) implanter needle and staff remain intact after hundreds of autoclaving cycles. Although the body in the older models bent in the first sterilizations (see below, “How to Fix Implanters”), the latest generation is stronger and better supports the autoclaving process.
4. Visual and tactile references that make it easy to identify the position of the needle channel
The ease of locating the position of the needle channel is important because the time between grasping the implanter and placing should be short. In the Lion implanter, the clip permits positioning the pen both by touch and visualization. In the OKT implanter, the position of the channel must be determined solely by visualization. Some brands have no signs and only direct channel viewing is done (Figure 4).
HOW TO STORE AND CLASSIFY FUS
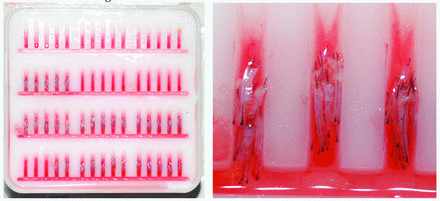
In order to avoid too much time out of the body, we routinely harvest only a few hundred FUs to sort and store them. They are kept chilled at a temperature of 4° Celsius. Each team has a routine. We have developed a Graft Organizer Board (Figure 5) with the following characteristics (Video 3):
Board of plastic material suitable for autoclaving. There are four lines of slots. Each line has 15 slots and each slot stores 10 grafts, totaling 150 FUs per line. The board stores up to 600 FUs.
As the FUs are harvested from the donor area, they are inspected under the microscope. They are stored in the slots in groups of 10 FUs. Grafts are classified as 1-, 2-, and 3-hair grafts. Transected hairs are trimmed away and excess skin is removed in singles. In specific slots, we put FUs with the same number of hairs.
Graft Organizer Board
Three main advantages of organizing grafts in this board include the following:
Grafts are parallel, which facilitates graft removal, placement on the glove, and loading of the implanters.
A number greater than 10 could expose the FUs to excessive dryness. A number less than 10 would increase the interruptions to get more FUs from the board. A fixed number creates a routine and speeds up the process.
Just looking at the board and counting the number of slots filled with FUs allow you to know the exact number of remaining grafts. This same count would take several minutes if the FUs were scattered in the petri dish.
(Note: The Graft Organizer Board is made in Brazil by Rhosse Instrumentos e Equipamentos Cirúrgicos LTDA, www.rhosse.com.br. The author has no conflict of interest.)
HOW TO CHOOSE THE DIAMETER OF THE IMPLANTER NEEDLE
The smallest possible diameter should be chosen. In this way, unnecessary trauma is avoided in the recipient area and the highest possible density is achieved. The choice is made by testing different diameters, case by case. In FUE harvesting, there is a greater uniformity in size, making the choice easier:
0.64mm implanter/premade sites of 0.5mm (coronal or sagittal).5 General application: singles in the hairline, with partial removal of the epidermis. We prefer coronal incisions, but it can also be used in sagittal. In eyebrow transplantation, the incisions are necessarily coronal.
0.8mm implanter/premade sites of 0.7mm. General application: beard transplantation. The punches used for harvesting the FUs are usually 0.7-0.8mm in diameter. When we transplant beard hairs into the face, we prefer coronal incisions, since they allow very sharp angle incisions. For beard hair transplanted into the scalp, both coronal and sagittal incisions can be used.
0.9mm implanter/premade sites of 0.75-0.8mm. General application: scalp transplantation. The punches used for harvesting the FUs are usually 0.9-1mm in diameter. They can be used in both coronal and sagittal incisions.
1mm implanter/premade sites of 0.80 or 0.85mm. General application: for coarse hair and FUs with many shafts. The punches used for harvesting the FUs are usually 1-1.1mm in diameter. They can be used in both coronal and sagittal incisions.
1.15mm implanter/premade sites of 0.90 or 0.95mm. General application: coarse hair and FUs with many shafts. The punches used for harvesting the FUs are usually 1-1.1mm in diameter. They can be used in both coronal and sagittal incisions.
HOW TO ADJUST THE NEEDLE LENGTH
In every surgery, it is necessary to adjust the length of the needle according to the length (average) of the graft (Figure 6). With a short needle, the graft does not fit, and with a needle that is too long, the trauma is increased (Video 4) while increasing the chance of burying the FUs. The consequence of this is the formation of cysts in the postoperative period and poor growth.
The length of the needle can be adjusted.
The same adjustment is made in all implanters. Each brand has its own mechanism to adjust the length. This is usually done by rotating the parts. Among the implanters tested (Hwang, KNU, Lion, OKT, Rainbow, Smart), only the OKT additionally allows an adjustment in the length of the body. Other manufacturers have fixed body length.
LOADING THE IMPLANTER
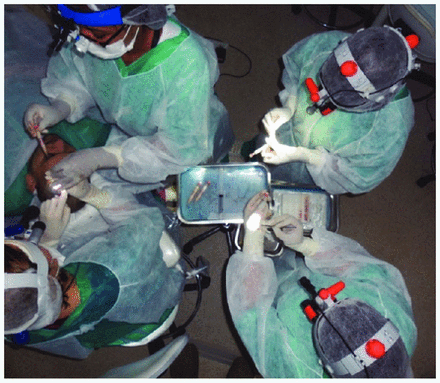
The Graft Organizer Board stands on the table. Two technicians are usually in charge of loading the implanters. According to preference, they can stand or sit (Figure 7). If the placement is faster than the loading, a third technician should be added (Video 6).
Team layout in the operating room
Although many do this with the naked eye, it is recommended that you use loupes with a magnification of 2.5-4.5×. There is often an initial resistance to using this equipment. Proper education will show the benefits of better visualization. Our preference is 4.5× loupe and LED light.
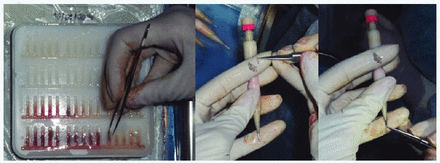
Straight forceps are used to load the implanters. With this forceps, the operator grasps 10 FUs of each slot and places them on the glove of the left hand (for right-handed technician) (Figure 8). Each technician loads 10 to 20 FUs per minute. Thus, no graft is out of the storage solution for more than 1 minute. A partition separates the loaded implanters from the unloaded ones.
Loading the implanter with forceps
A right-handed technician places the FUs on the glove with the concave side (sebaceous gland side) facing up or left (up or right for a left-handed technician).
Grafts are grasped by the dermis, above the sebaceous gland, and should be carried with the concavity facing outwards and convexity inward. The epidermis is kept out of the channel and the follicle should be positioned at the level the channel starts, to prevent it from leaving at the time of implantation (Figure 9).
The sebaceous gland is visible. Epidermis is kept out of the channel.
If the identification of the concave and convex sides is difficult (very straight hair), the visualization of the sebaceous gland defines the concave side. In the same way, the epidermis is visible on the convex side (Video 5). This differentiation is crucial for correct loading and placement with the FU correctly directed.6
HOW TO GET IMPLANTERS
The placer can pick up the loaded implanters directly from the instrument table (Dr. José Lorenzo’s technique) or a third technician can be used (Figure 7), which mediates the doctor’s delivery to the instrument table and vice versa (Dr. Jae Hyun Park’s technique).8 In this case, the technician removes the empty implanter from the placer’s hand and places it back on the table while using the other hand to deliver the loaded implanter (Video 6).9 With this routine, it is possible to place 15 FUs (most difficult cases) to 28 FUs per minute (easy cases). Whatever the technique, the loaded implanter should always be placed on the table in the same position.
HOW TO PLACE FUS
In the DNI technique, the incisions are premade with needles or chisel blades (our preference). Premade sites are defined by the size, density, direction, angle, and depth.10,11 It is the responsibility of the placer to rotate the graft so the hair grows in the correct direction. For this, it is crucial that the implanter loading is done correctly (Video 5):
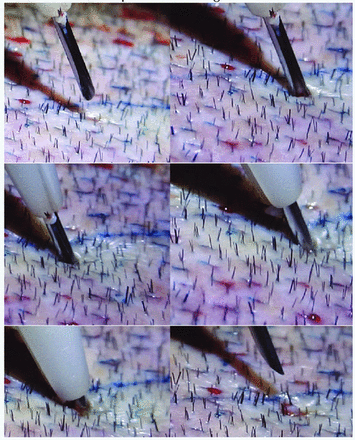
Coronal incisions: With the bevel facing down, the needle is inserted into the site. When the epidermis of the FU is at the level of the epidermis of the scalp (or discretely above this), we press the plunger to inject the graft. Simultaneously, the implanter is pulled out. (See Figure 10.)
Sagittal incisions: If the right-handed surgeon stands behind or on the patient’s side, the needle bevel is inserted into the premade site parallel to it (with the channel facing left). At this point, we check if the implanter has loaded correctly. While inserting the needle into the site, we rotate the implanter 90 degrees clockwise to position the bevel forwards and downwards and thus prevent the bulb from leaving the implanter. With the concavity forward, we push the staff until the epidermis is at or slightly above the epidermis of the scalp. When the implanter is pulled out, we check if the FU was placed in the correct depth. Any adjustment can be made with the tip of the needle and in some cases with forceps. If the implanter is improperly loaded, after entering the site as described above, the needle must be rotated until the FU is in the right position. If the convexity is facing the channel (180-degree error), instead of turning the needle 90 degrees forward, we turn it in the opposite direction (counter-clockwise). (See Figure 11.)
Graft is placed into a coronal incision.
Graft is placed into a sagittal incision.
HOW TO CLEAN THE IMPLANTER
At the end of the surgery, the implanters are completely dissembled and placed in a germicidal solution (Video 7). Caution should be taken so that parts of different implanters are not mixed. Some parts are not compatible depending on the size of the needles. They are left in solution for some minutes or until the following day for better penetration of the liquid. The parts are brushed individually. Special attention is given to the needles. The staff itself is used to unclog the inside of the needle, thereby removing blood or tissue debris. We also use a 10cc syringe to inject the solution into the needle for further cleaning.
After rinsing under running water, the parts are placed in the ultrasonic washer for the time recommended by the manual. Although unnecessary, we repeat the ultrasonic cleaning cycle to ensure further cleaning of the material.
The parts are again washed in running water and dried one by one with a cloth. We complete the drying with an air compressor. We set up the implanter without the needle, spring, and staff. Because they contain metal parts, we sterilize them separately using a longer cycle and at a higher temperature.
HOW TO STERILIZE THE IMPLANTER
The sterilization can be done with ethylene oxide, autoclave, or cold sterilization solutions (Video 8). Acceptable forms depend on the health legislation of each country. In our clinic, we use autoclaving for ease, speed, and safety. The major drawback of autoclaving is the risk of compromising the implanter functioning. We set up the implanter without the needle, staff, and spring. We sterilize the plastic parts with the corresponding cycle according to the autoclave manual. The steel parts (needle, staff, and spring) are sterilized in the longer cycle along with other metal instruments (Figure 12).
Steel parts are sterilized separately using a longer cycle.
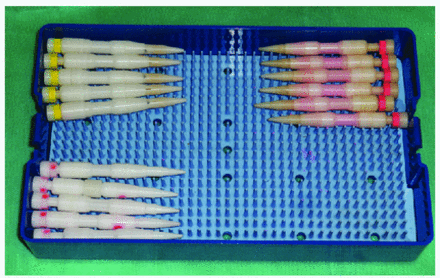
The plastic bodies of the implanter are placed in a multiperforated box with a silicone surface that avoids direct contact with steel parts, which could heat up and render the instrument unusable (Figure 13).
Implanters in box with silicone surface to be sterilized.
HOW TO FIX IMPLANTERS
The heat from the autoclave can deform the implanters and lead to the detachment of some parts. The following describes the required maintenance on two different brands of implanters.
Lion implanter. The implanter itself resists autoclaving without deforming. But both the needle and the body have steel and plastic parts. After a few cycles, these parts fall off and need to be glued with “Superbonder.” It is essential to glue the parts together by comparing them with the intact originals so that they are perfect. Attention should be paid to the position of the needle channel relative to the plastic part. After a few additional cycles of autoclaving, there may be another detachment and it can be necessary to repeat the bonding (Video 9).
OKT implanter: Its advantage lies in the fact that both the needle and the body are non-detachable, maintenance-free steel parts. The old implanter deformed with the heat and it used to be necessary to sand some parts. The latest generation is heat resistant, requiring no maintenance (Video 10).
How to assemble and disassemble implanters
The videos below show how to assemble implanters from different companies:
https://youtu.be/oUPcqjXUVRM KNU implanter (Medisol)
https://youtu.be/8TxruXXlLs8 Rainbow Hair Implanter (Seson Medical)
https://youtu.be/4xyu6A47KjY Lion implanter (Hansbiomed)
https://youtu.be/WgI1GB9rpB4 and https://youtu.be/VHRS340YGsQ Hwang implanter
Video List
Video 1: “Modifying an implanter needle”
https://1drv.ms/v/s!Ag3YBmWGIji_gatwNDY6jU85-VkFNA
Video 2: “Loading the implanter”
https://1drv.ms/v/s!Ag3YBmWGIji_gatvXf37nnN0Jq_A0w
Video 3: “Graft Organizer Board”
https://1drv.ms/v/s!Ag3YBmWGIji_gatyNaQE3PQFAsqMuA
Video 4: “How to adjust the length of the needle”
https://1drv.ms/v/s!Ag3YBmWGIji_gatx6pGRfVf9TKPgVQ
Video 5: “How to load implanters and how to place grafts into coronal and sagittal incisions”
https://1drv.ms/v/s!Ag3YBmWGIji_gat0-K7aLssJJbAORw
Video 6: “Team layout in the operating room”
https://1drv.ms/v/s!Ag3YBmWGIji_gatzGyLdfPy8JLMwZg
Video 7: “How to Clean the Implanter”
https://1drv.ms/v/s!Ag3YBmWGIji_gat3grPNE19_zZwIEQ
Video 8: “How to sterilize the implanter”
https://1drv.ms/v/s!Ag3YBmWGIji_gat2ip6H2-i2FAWORw
Video 9: “How to repair the needle after autoclaving”
https://1drv.ms/v/s!Ag3YBmWGIji_gat1LT3A8ql-TCWwnA
Video 10: “How to fix a bended implanter”
- Copyright © 2017 by The International Society of Hair Restoration Surgery


